回顾我学习和使用 LaTeX 的经历,有几个时间节点让我感触颇深:
- 初次接触 LaTeX 时,感受到它对样式强大的控制能力和对数学公式的排版能力,心中对 Microsoft Word 颇有愤懑。
- 熟练使用 LaTeX 后,困于 LaTeX 中过于强大的样式控制能力带来的复杂性与笔记等需要速记的场景之间难以调和的矛盾。
- 初次接触 Markdown 时,感受到它在内容和样式之间取得了比较好的平衡。它的样式可以用 CSS 来控制。
- 折腾 Sphinx、Pandoc 等工具尝试将 Markdown 文稿转换为 LaTeX 文稿时,对这些工具的转换效果和细节问题感到崩溃。
在这之后很多年里,我一直期待能有一个工具,能够更好地平衡 Markdown 的便捷性和 LaTeX 对样式的控制能力和对数学公式的排版能力。前几天,我发现了 markdown 宏包。我认为已找到了这样梦想中的工具。并且,我认为在熟练使用它之后,可以更好地实现 LaTeX 设计之初的愿望:内容与样式分离。
本文又名:「你喜爱的 Markdown 写作,现更以 LaTeX 呈现」。
——来自 Harry Chen 的 Apple 风格标题。
介绍
markdown 宏包是 Vít Novotný 维护的一个宏包。它的核心机制使用 Lua 编写,同时提供了针对 Plain TeX/LaTeX/ConTeXt 等格式的接口。由于现代 TeX 发行版(TeX Live、MiKTeX 等)通常都包含了 Lua 解释器,因而使用 markdown 宏包通常无需额外安装其他工具,只需打开 --shell-escape 标记即可(LuaLaTeX 除外)。相对 Sphinx、Pandoc 等第三方工具以及之前社区实现的其他类似功能的宏包,这算是一个飞跃式的进步。
markdown 宏包提供了名为 markdown 的环境和 \markdownInput 的命令。前者用于在 LaTeX 文稿中直接书写 Markdown 标记内容,后者用于从 Markdown 文件中读入内容。markdown 宏包会在遇到 markdown 环境或者 \markdownInput 命令时,将相应内容交由 Lua 解释器处理,从而将内容翻译成一堆预定义好的 LaTeX 宏。由于这个步骤需要调用 Lua 解释器,故而需要打开 --shell-escape 标记;当然,如果使用 LuaLaTeX 的话,因为直接能交给 Lua 解释器处理,故而不需要打开 --shell-escape。而后,TeX 引擎会读入这些翻译得到的 LaTeX 宏,进行正常的 LaTeX 处理。
对于常见的 Markdown 功能,markdown 宏包都预设了 LaTeX 宏相应的实现。例如 \markdownRendererImage 是用来渲染图片的宏,当解析到  时,Lua 解释器就会使用这个宏来拼接得到翻译结果:\markdownRendererImage{imagelabel}{imagepath}{imagepath}{image caption}。而后,根据 \markdownRendererImage 的定义,TeX 引擎会在后续步骤展开这个宏,再去排版得到相应的结果。
基本用法
初识
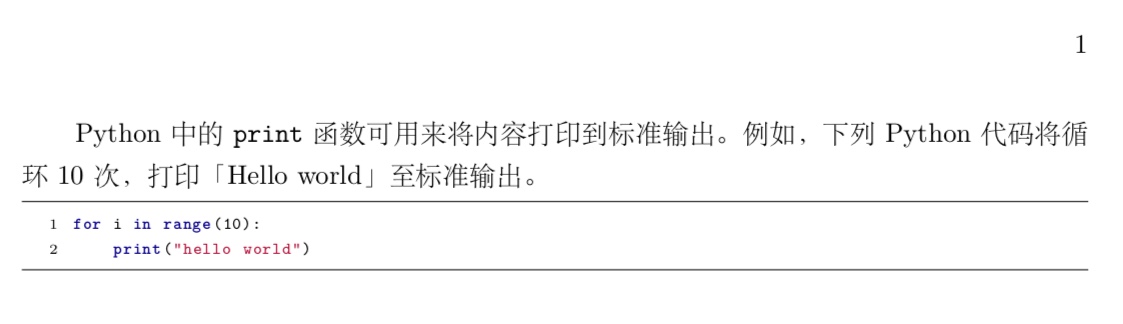
在 LaTeX 中,使用 markdown 宏包和其他宏包没有太大的区别,只需要使用 \usepackage{markdown} 即可引入该宏包。例如,我们在 ctexart 文档类下结合 markdown 宏包使用看看。
1 | \documentclass[UTF8]{ctexart} |
因为使用了 markdown 宏包,所以在编译时需要打开 --shell-escape 标记。又因为使用了 ctexart 文档类,所以这里选用 XeLaTeX 来编译。假设上述内容被保存为 example.tex,则编译用的命令行如下:
1 | xelatex --shell-escape example.tex |
如果你使用 TeXworks!/TeXshop/TeXstudio/WinEdt/VSCode/Atom 等 IDE/Editor,则你可能需要将
--shell-escape这一标记配置到你的编译工具当中去。具体如何配置,请参考你使用的 IDE/Editor 的文档。
得到结果如下图所示。
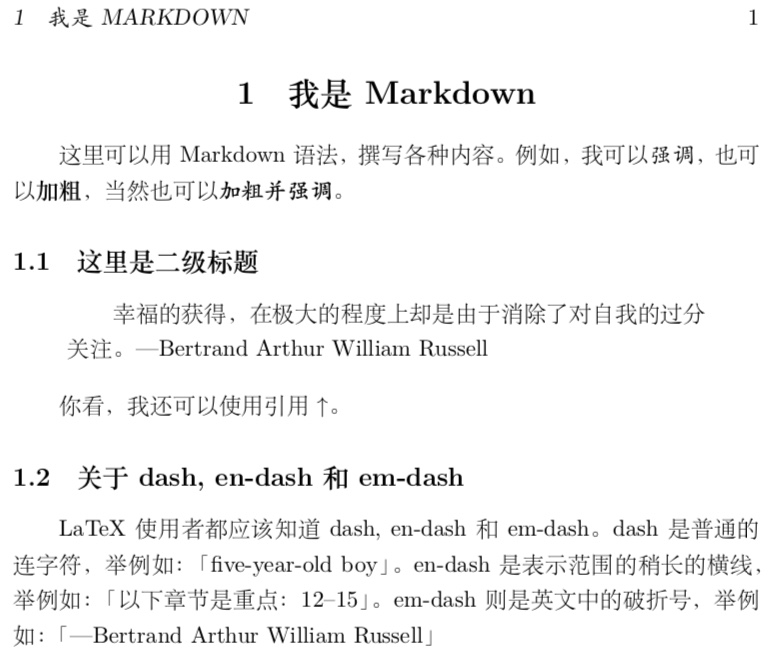
是不是感觉「效果拔群」?别激动,这里还是要做进一步的解释。
首先是关于 Markdown 中的章节标题(sectioning)。在 Markdown 中,章节标题通常使用井号 # 来标记。一个井号表示一级标题,两个井号表示二级标题,以此类推。在 LaTeX 中,章节标题的样式和含义随所使用的文档类的不同而有所区别。例如,book 及其衍生文档类中,最高级别的标题是 \chapter;article 及其衍生文档类中,最高级别的标题是 \section。为此,markdown 宏包在代码中做了适配。当有 \chapter 定义时,# 这里是标题 被翻译成 \chapter,## 这里是标题 被翻译成 \section,以此类推。当没有 \chapter 定义时,# 这里是标题 被翻译成 \section,## 这里是标题 被翻译成 \subsection,以此类推。
而后是关于强调、加粗、加粗强调、引用等 Markdown 中的经典格式标记。这些格式标记会被 markdown 宏包翻译成特定的 LaTeX 宏,这些宏又有预先的定义。例如强调被翻译成 \markdownRendererEmphasis,它被预定义成 \emph,因此有相应的效果。
最后是关于 dash, en-dash 和 em-dash。在 markdown 宏包中的用法和在普通的 LaTeX 文稿中的用法完全相同:一个短横线 - 表示连字符,两个短横线 -- 表示 en-dash,三个短横线 --- 表示 em-dash。
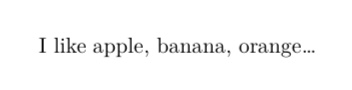
关于省略号——markdown 宏包参数初体验
markdown 宏包还提供了一系列由参数控制的功能。这里用英文的省略号来引出 markdown 宏包的参数之一:smartEllipses。它表示 markdown 宏包会将 Markdown 文稿中连续的三个英文句点 ... 自动转换成英文的省略号。
1 | \documentclass{article} |
我们注意到,宏包参数通过 \markdownSetup 宏由 key-value 的形式给出。
列表及其增强
Markdown 中有有序列表和无序列表,分别对应 LaTeX 中的 enumerate 和 itemize 环境。markdown 对有序列表的语法做了一定的增强,它允许用户使用 #. foobar 的形式撰写有序列表。这一特性需要通过 hashEnumerators 参数打开。
1 | \documentclass[UTF8]{ctexart} |
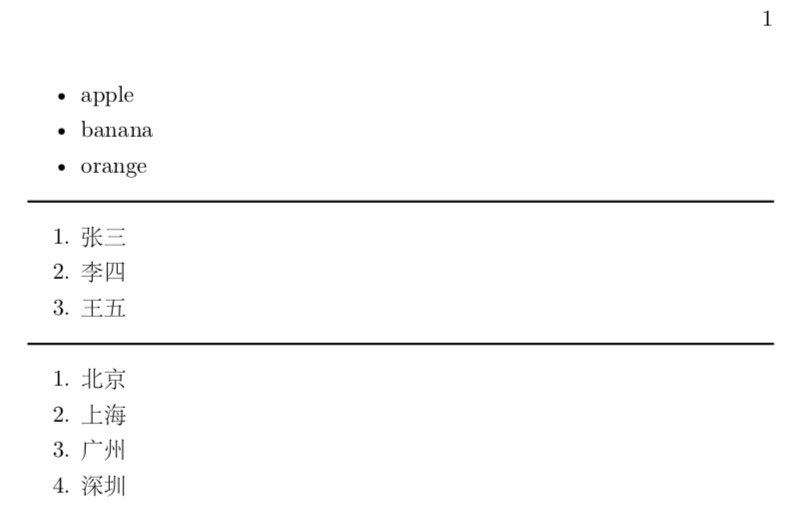
我们注意到,单独占据一行的连续的多个短横线,可以形成一条横向的分割线。
超链接和脚注
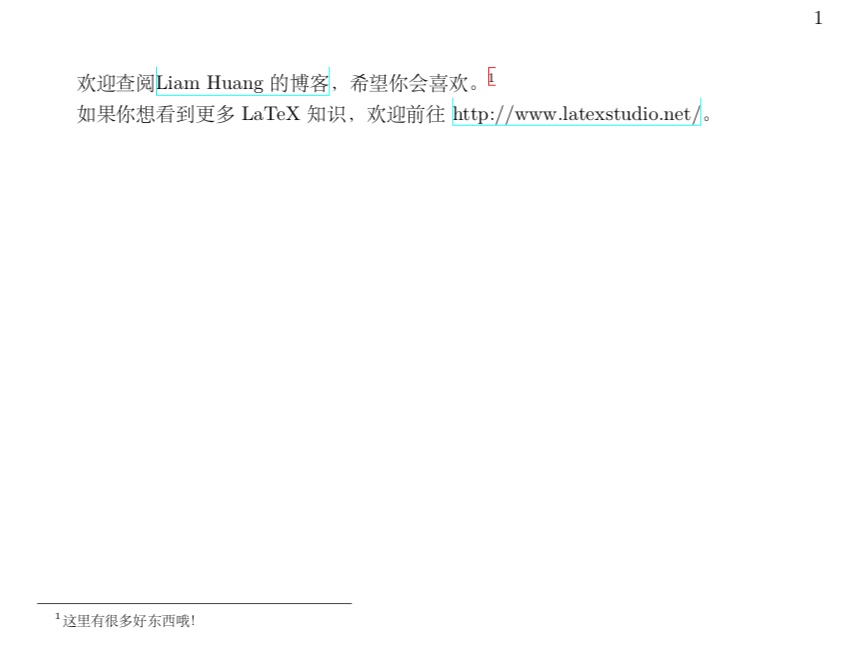
在 Markdown 中,人们可用 [anchor](uri) 形成带锚文本的超链接,也可使用 <uri> 形成不带锚文本的超链接。在扩展的 Markdown 中,还可以使用 ^[footnote text] 生成尾注。markdown 宏包也支持这些功能,不过,这需要打开 inlineFootnotes 参数。
1 | \documentclass[UTF8]{ctexart} |
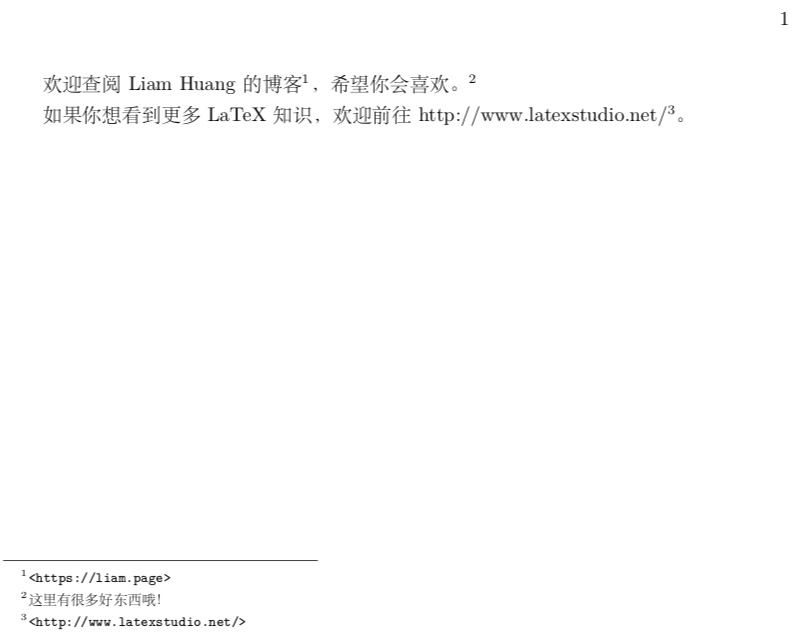
可见,Markdown 中的尾注变成了 LaTeX 中的脚注。另外,超链接的默认效果不太好,可借助 hyperref 宏包做进一步定制。
1 | \documentclass[UTF8]{ctexart} |
代码块
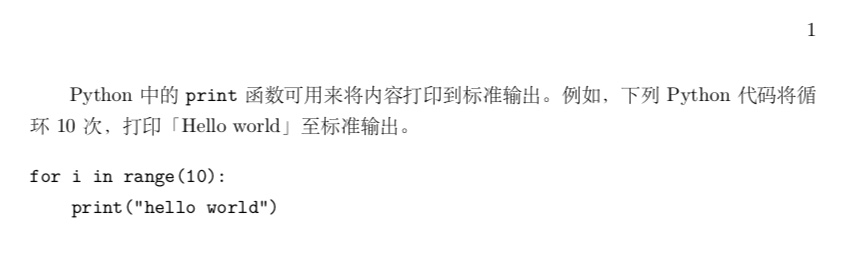
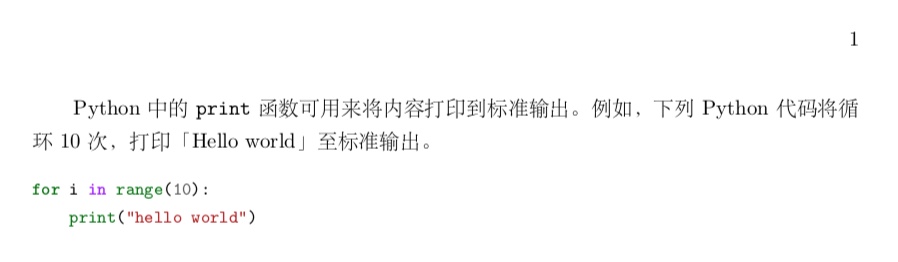
在 Markdown 中插入代码是很方便的事情。在行内插入代码只需要在两个反引号直接插入内容即可,例如 `\LaTeX`。对于插入多行代码,原始的 Markdown 语法是缩进 4 个空格。不过,绝大多数 Markdown 编辑器/渲染器都支持连用三个反引号的扩展形式。为此,我们需要打开 fencedCode 参数。
1 | \documentclass[UTF8]{ctexart} |
这样排版出来的效果不是很好,相当于使用了 LaTeX 的 verbatim 环境排版代码。不过,markdown 宏包贴心地与 listings 及 minted 宏包做了适配——只要使用了 listings 或者 minted 宏包,代码环境就会自动利用相应宏包的相应设置进行排版。在扩展用法一节当中,我们将会看到这一点。
插入图表
Markdown 中插图的语法是 ,扩展的 Markdown 语法中则有表格的用法。前者在 markdown 宏包中直接支持,后者则需要打开 pipeTables 参数。
1 | \documentclass[UTF8]{ctexart} |
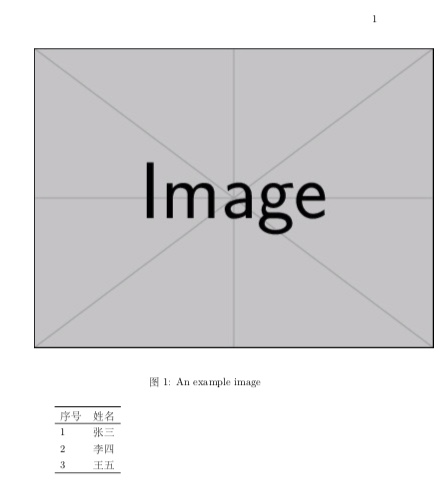
注意到这里有两个问题:一是图片超宽,而在默认的 Markdown 语法中无法对图片宽度进行控制;二是三线表的线条粗细有问题。
后者可以通过引入 booktabs 宏包解决。markdown 宏包对此进行了适配,一旦检测到引入了 booktabs 宏包,三线表会自动选用 booktabs 宏包定义的表线来处理。前者则比较麻烦,将在「扩展用法」一节中介绍。
扩展用法
美化代码块
前面提到 markdown 对 listings 和 minted 宏包进行了适配,故而在引入相应宏包之后,可以更美观地排版代码块。这里举例说明。
首先是 minted 宏包。使用 minted 宏包时,需确保已安装好 Python 及 Pygments 库,并将相应的二进制文件所在的目录添加至系统环境变量 PATH。
1 | \documentclass[UTF8]{ctexart} |
然后是 listings 宏包。
1 | \documentclass[UTF8]{ctexart} |
混合 LaTeX 语法
虽然 Markdown 很方便,但终究不如 LaTeX 对格式的控制能力强。特别地,若是要在 Markdown 中插入数学公式,单纯的 Markdown 就无能为力了。markdown 宏包提供了 hybrid 参数,当它打开时,我们可以在 Markdown 中(几乎)如常地使用 LaTeX 宏和数学公式。
1 | \documentclass[UTF8]{ctexart} |

更好地插入图片
为了解决插图宽度控制的问题,就要搞清楚 Markdown 插图标记经过 markdown 宏包翻译之后的宏,展开后会是怎样。答案在 markdown.sty 文件当中,对 renderersPrototypes 的定义有如下代码:
1 | image = {% |
可见 \includegraphics{ #3 } 并未对图片大小做任何限制。好在,我们既然已知是用 \includegraphics 插图,就可以通过 graphicx 宏包提供的接口来修改插图样式。graphicx 宏包使用 Gin 这个分组(可以理解为 C++ 当中的名字空间)对参数进行管理。为了控制插图宽度,可以这样做:
1 | \setkeys{Gin}{width = .8\linewidth} |
于是,对于插图之前的例子来说,可以这样做:
1 | \documentclass[UTF8]{ctexart} |
注意,这里因为要使用 LaTeX 宏,所以需要打开 hybrid 参数。如此,我们就(部分地)解决了图片宽度控制的问题。不过,这样也引出了新的两个问题:
- 在
figure环境当中套用center环境是不对的,这样会因center环境引入额外的垂直方向的空距。 - 在 Markdown 文稿中这样使用 LaTeX 宏——非是解决 Markdown 无法插入的内容,而是为了样式控制——有滥用的嫌疑。
为解决问题 1),我们需要修改 images 的渲染方式;在解决问题 1) 的过程中,可以顺带部分解决问题 2)。代码如下:
1 | \documentclass[UTF8]{ctexart} |
这样一来,每次使用 Markdown 语法插入图片,其宽度都会是 .8\linewidth,并且解决了因误用 center 环境带来的额外的竖直方向空距。当然,也可以用更巧妙的办法,通过判断图片的实际宽度,决定是否需要限制宽度,不过,这超出了本文的讨论范围,按下不表。
跋
markdown 宏包是个很出彩的宏包,它还有很多功能,本文无法尽数。因此,欢迎各位读者继续阅读 markdown 宏包的文档,开发更多用法甚至是玩法。